Building a Extract, Load, Transform (ELT) Pipeline with Airflow, dbt, Snowflake and Docker
Last Updated: 7/25/2024
Published by: Evan Gabrielson
Return to Spotlights
It can can be a daunting task to manage end-to-end data workflows without the right tools. In this project, we'll examine how to supercharge Airflow, the powerful data workflow orchestrator, by integrating complex SQL transformations built in dbt. By the end, you'll understand how to connect a Snowflake data warehouse, how to create simple directed acyclic graphs (DAGs) in Airflow, and finally how to develop and schedule a set of SQL transformations for a unified data warehousing workflow with dbt. When building new machine learning solutions, data scientists and data engineers often face the challenge of rerouting existing data flows for processing, which can disrupt traditional storage solutions. By employing an Extract, Load, and Transform (ELT) approach, we can perform data processing post-storage, ensuring seamless integration with established storage systems such as SQL databases and S3 buckets.
This project is completely free (yes $0.00 free!) and is a great starter project for developers looking to break into the field of Data Engineering or Data Science.
Airflow plays a crucial role in managing the graph representation of the data workflow, known as Directed Acyclic Graphs (DAGs). This structure allows us to define the sequence and dependencies of data processing tasks, ensuring efficient and error-free execution. dbt, on the other hand, connects to Snowflake and compartmentalizes data transformations using SQL, providing a clear and organized framework for managing data models. When combined, Airflow + dbt provides data teams with shared visibility and granular control over their data models to speed up development, maintenance and testing across all data workflows.
In this tutorial, we will walk through setting up Airflow to orchestrate our data workflows and leveraging dbt to perform data transformations within Snowflake. We will use Docker to spin up Airflow and run dbt locally, ensuring a consistent and isolated development environment. Python will be our programming language of choice, and we will use pip as the package manager to install and manage our dependencies.
By the end of this tutorial, you will have a comprehensive understanding of how to automate and manage complex data workflows for machine learning projects using Airflow, dbt, and Snowflake. This integration will enable you to streamline your data processing pipelines, allowing you to focus on developing and deploying machine learning models with ease.
To get started, you will need to sign up for a free personal account with Snowflake. Once you are logged into your Snowflake account, create a new SQL worksheet to begin executing database commands.
Snowflake data warehouses store structured and semi-structured data for business intelligence (BI) activities as we'll explore here.
Before creating a new data warehouse, be sure you've toggled on the accountadmin role using the following SQL worksheet command:
use role accountadmin;
We select the smallest-sized warehouse but feel free to view and select a different warehouse sizes from this list.
create warehouse {{WAREHOUSE_NAME}} with warehouse_size='x-small';
By creating a data warehouse using admin privileges, we are allowing anyone with access to the accountadmin role to edit or delete the data warehouse.
In this warehouse, we can establish a new smaller-scoped role for managing our resources for better security.
If you want to learn more about roles or grants, I suggest reviewing this article on Access Control published by Snowflake.
In addition, we'll create a new SQL database to store our all of our data transformations on the input data.
create role if not exists {{ROLE_NAME}}; -- Create a role: choose any role name you like (i.e. "dbt_role")
create database if not exists {{DATABASE_NAME}}; -- Create a new SQL database: choose any database name (i.e. "dbt_db")

show grants on warehouse {{WAREHOUSE_NAME}}; -- List all privileges granted on the warehouse
Running the above should return database and role creation success messages in the "Results" tab. The last line should output a list of the privileges roles have on the created warehouse.

The next step is to grant all necessary privileges to the new role so that we can operate on the data warehouse from dbt.
grant role {{ROLE_NAME}} to user {{SNOWFLAKE_USERNAME}};
grant usage on warehouse {{WAREHOUSE_NAME}} to role {{ROLE_NAME}};
grant all on database {{DATABASE_NAME}} to role {{ROLE_NAME}};

show grants on warehouse {{WAREHOUSE_NAME}};
Now there should be two privileges granted on the data warehouse for your new role: one privilege for ownership and one for usage. Having both of these privileges on the data warehouse will enable us to alter warehouse properties and execute high-level queries on the warehouse itself. If these powers become too broad for this role, you can always edit data warehouse grants later on.

Before we get started with Airflow, we need to create a database schema using the new role we spun up. This will allow us to generate tables and queries in SQL with the help of dbt.
use role {{ROLE_NAME}};

create schema if not exists {{DATABASE_NAME}}.{{DBT_SCHEMA_NAME}};
If and when you need to destroy the resources you instantiated above, executing the commands below should do the trick!
Be advised, if you run these drop commands before finishing the rest of the tutorial, you will not be able to operate on the Snowflake resources you created earlier... obviously.
-- clears resources (optional)
use role accountadmin;

drop warehouse if exists {{WAREHOUSE_NAME}};
drop database if exists {{DATABASE_NAME}};
drop role if exists {{ROLE_NAME}};
Now that we have our Snowflake resources set up, we can begin building our DAG empire with Airflow, dbt, and Docker! If you have not already worked with Airflow and Docker, don't worry, we'll walkthrough the whole process together. For this tutorial, I performed these local bash commands on MacOS (Sonoma 14.4.1) which is compatible with Linux, but I find this website is a great resource for translating Linux and Windows Commands if you're operating on a PC.
Start by installing the following tools:
Once these tools are successfully installed on your workstation, open a new Terminal or Command Prompt and cd into a new directory where you want your Airflow code to live.
$ cd my-projects/
$ mkdir elt-pipeline-airflow-tutorial
$ cd elt-pipeline-airflow-tutorial
To deploy Airflow on Docker Compose, we can fetch the docker-compose.yaml file developed by the maintainers of Airflow themselves.
$ curl -LfO 'https://airflow.apache.org/docs/apache-airflow/2.10.0/docker-compose.yaml'
This file defines several services that Airflow uses to schedule, execute and manage the DAG tasks we'll create later on.
airflow-scheduler - The scheduler which monitors tasks and DAGs, triggering task instances once upstream dependencies are finished.airflow-webserver - The webserver which is available at http://localhost:8080.airflow-worker - The worker which executes the tasks given by the scheduler.airflow-triggerer - The triggerer which runs the event loop for future tasks.airflow-init - The Airflow initialization service.postgres - The PostgreSQL database.redis - The redis broker which forwards messages from the airflow-scheduler to the airflow-worker.Before we spin up these services using Docker Compose, we need to create the following directories that are pre-mounted by the Docker image, meaning the directory contents are expected to be read from by the Docker container.
./dags - for our DAG files./logs - logs from the scheduler and task executor./config - for custom log parsers and cluster policies./plugins - for custom pluginsSet the Airflow user in an environment variable. Run the following command to automatically configure your .env file with an Airflow User ID.
$ echo -e "AIRFLOW_UID=$(id -u)" > .env
You should see a new .env file populate in your directory with one variable set inside.
AIRFLOW_UID={{YOUR_ID}}
The last step before initializing our application is to ensure the requisite Python packages get installed to the Docker image.
If this is confusing, think about package installations as a customization we're adding to the Airflow developers' prebuilt Docker image.
To add the Python packages we'll use in our Docker image, you can create a requirements.txt file in the project's root and add the following Python packages from dbt.
It is worth noting that changes to this file will only be visible to the Docker image on image initialization.
Make sure to drop all Docker resources before re-composing the image to ensure changes to requirements.txt are visible within the image.
dbt-snowflake==1.8.3
dbt-core==1.8.5
dbt-airflow==2.10.0
Then, we can create a new file called Dockerfile at the project root and paste the following Docker Compose instructions:
FROM apache/airflow:{{YOUR_AIRFLOW_VERSION}} #
COPY requirements.txt / #
RUN pip install --no-cache-dir "apache-airflow=={{YOUR_AIRFLOW_VERSION}}" -r /requirements.txt
In docker-compose.yaml, under "x-airflow-common", you can find the value for YOUR_AIRFLOW_VERSION in the "image" attribute which should appear as follows:
x-airflow-common:
  # In order to ...
  &airflow-common
  image: ${AIRFLOW_IMAGE_NAME:-apache/airflow:2.10.0} # <-- Here it is! (The version is 2.10.0)
  # build: .
Now we can comment out this "image" attribute and comment in the "build" attribute below it.
This tells Docker Compose that we will be using the Dockerfile image in the project root instead of the default Airflow image.
x-airflow-common:
  # In order to ...
  &airflow-common
  # image: ${AIRFLOW_IMAGE_NAME:-apache/airflow:2.10.0} # <-- Here it is! (The version is 2.10.0)
  build: .
Finally, we can initialize our database and open the Airflow Interface to see our blank Airflow application.
docker compose up airflow-init
After the initialization is complete (takes 3-5 minutes), navigate to a new browser window at localhost:8080 to view Airflow and login with the default credentials (username "airflow" and password "airflow").
docker compose up
Congratulations on setting up a blank Airflow application! How easy was that?
Let's move on to writing the code for our first DAG using dbt.
If you need to delete or reset your container for whatever reason, exit the running Docker instance then run:
docker compose down --volumes --rmi all
Often times data warehouses rely on SQL for the "T" in ELT, but dbt Core developed by dbt Labs extends SQL data transformations with dynamic scripting, conditional logic, reusable macro functions, idempotency and much more.
Thus far, we've spun up a Docker container for running our Airflow services and for installing the Python packages we'll work with in this section to build our first DAG.
Airflow searches the mounted /dags folder for files defining DAGs, so that is where we'll be adding our dbt setup.
To make sure your Airflow setup is working, copy this starter Python code in a new file inside the /dags folder called dbt_dag.py.
from datetime import datetime, timedelta

from airflow.models.dag import DAG
from airflow.operators.bash import BashOperator


# Create temporary DAG resource
with DAG(
    "dbt-dag-tutorial",
    schedule=timedelta(days=1),
    start_date=datetime(2021, 1, 1),
    catchup=False,
    tags=["example"],
    default_args={
        "owner": 'airflow',
        "retries": 1,
        "retry_delay": timedelta(minutes=5),
    },
) as dag:

    # Task 1 - Get the date
    t1 = BashOperator(
        task_id="get_date",
        bash_command="date"
    )

    # Task 2 - Sleep for five seconds
    t2 = BashOperator(
        task_id="sleep_five",
        depends_on_past=False,
        bash_command="sleep 5",
        retries=3
    )

    # Task 3 - Print today and tomorrow's dates
    t3 = BashOperator(
        task_id="print_date",
        depends_on_past=False,
        bash_command='echo "Today is {{ ds }}. Tomorrow is {{ macros.ds_add(ds, 1)}}."'
    )

    # Define the DAG
    # Task #2 & #3 depend on Task #1
    t1 >> [t2, t3]
Feel free to skim this code or ignore, we'll be changing it shortly.
Once the file is saved, check for this DAG by searching for dbt-dag-tutorial in the searchbar or by using the filter options.
Clicking on the DAG should redirect you to an interface similar to the one below.
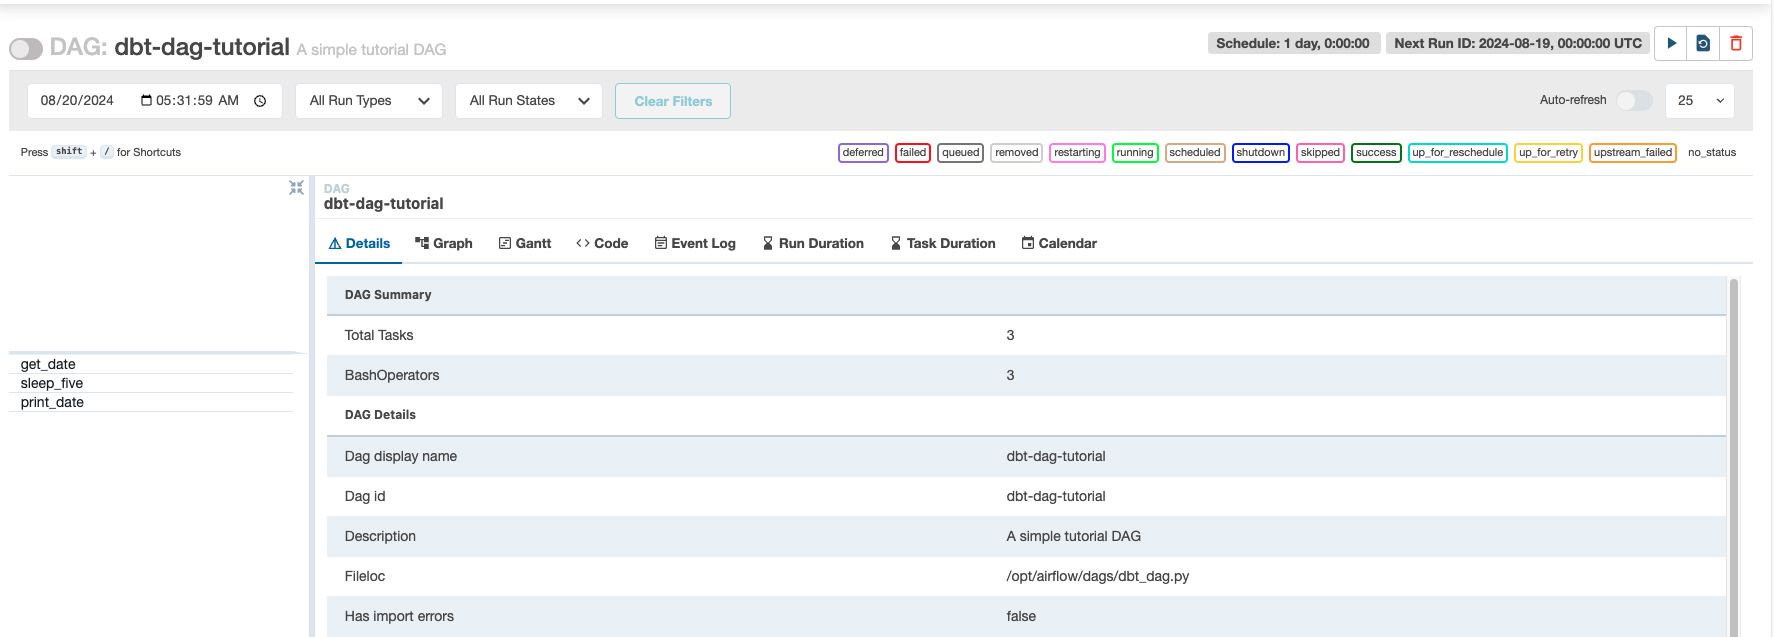
As you can see, there should be 3 total tasks, all of which are BashOperators. If you have time, I would highly recommend reviewing each tab to understand the role they play in maintaining DAG code. To test your newly added DAG, click the Play button in the top-right corner next to the Refresh and Delete icons. It should take about 10-20 seconds to execute.
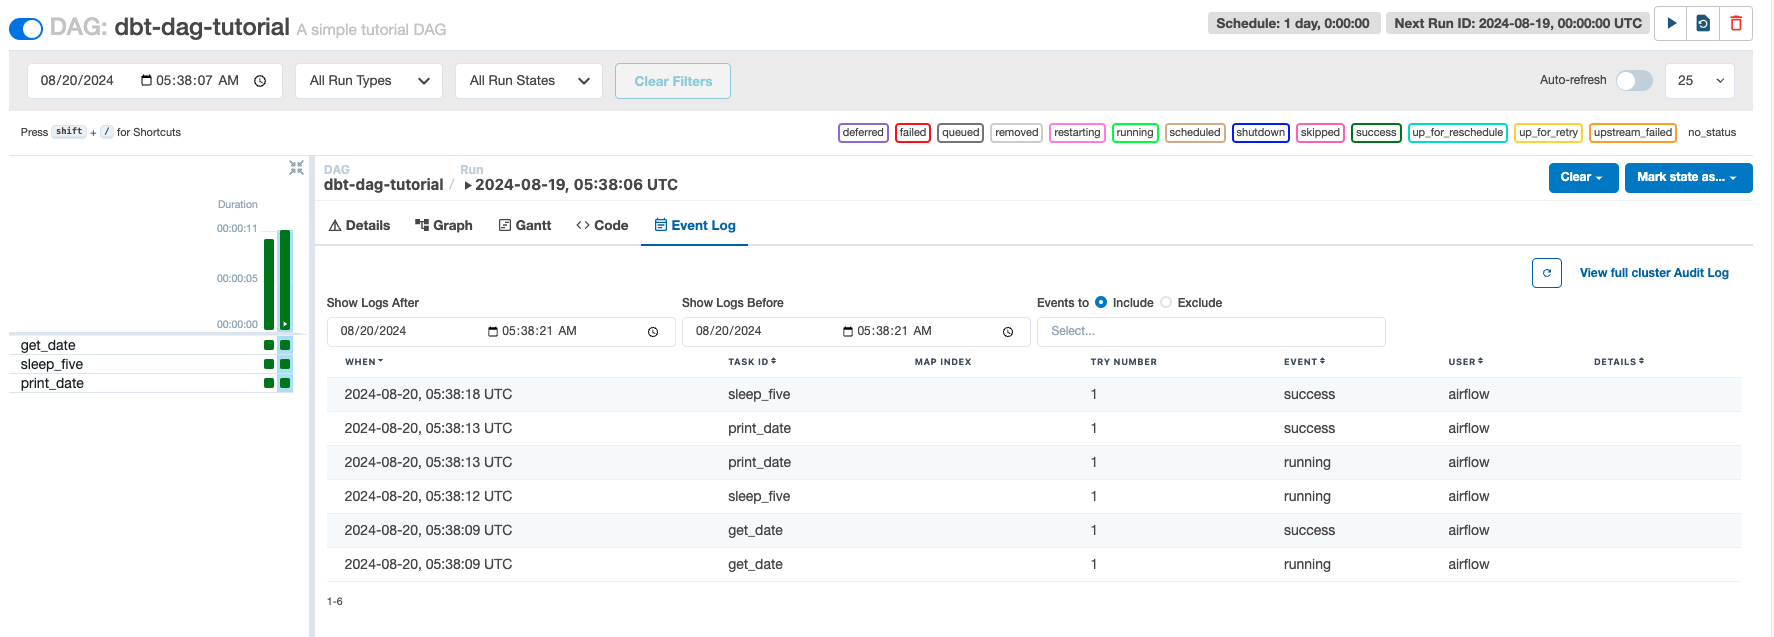
Look at you! You have just ran your first DAG routine, so exciting!
You might be wondering, "Okay... but I still don't know what today and tomorrow's dates are?".
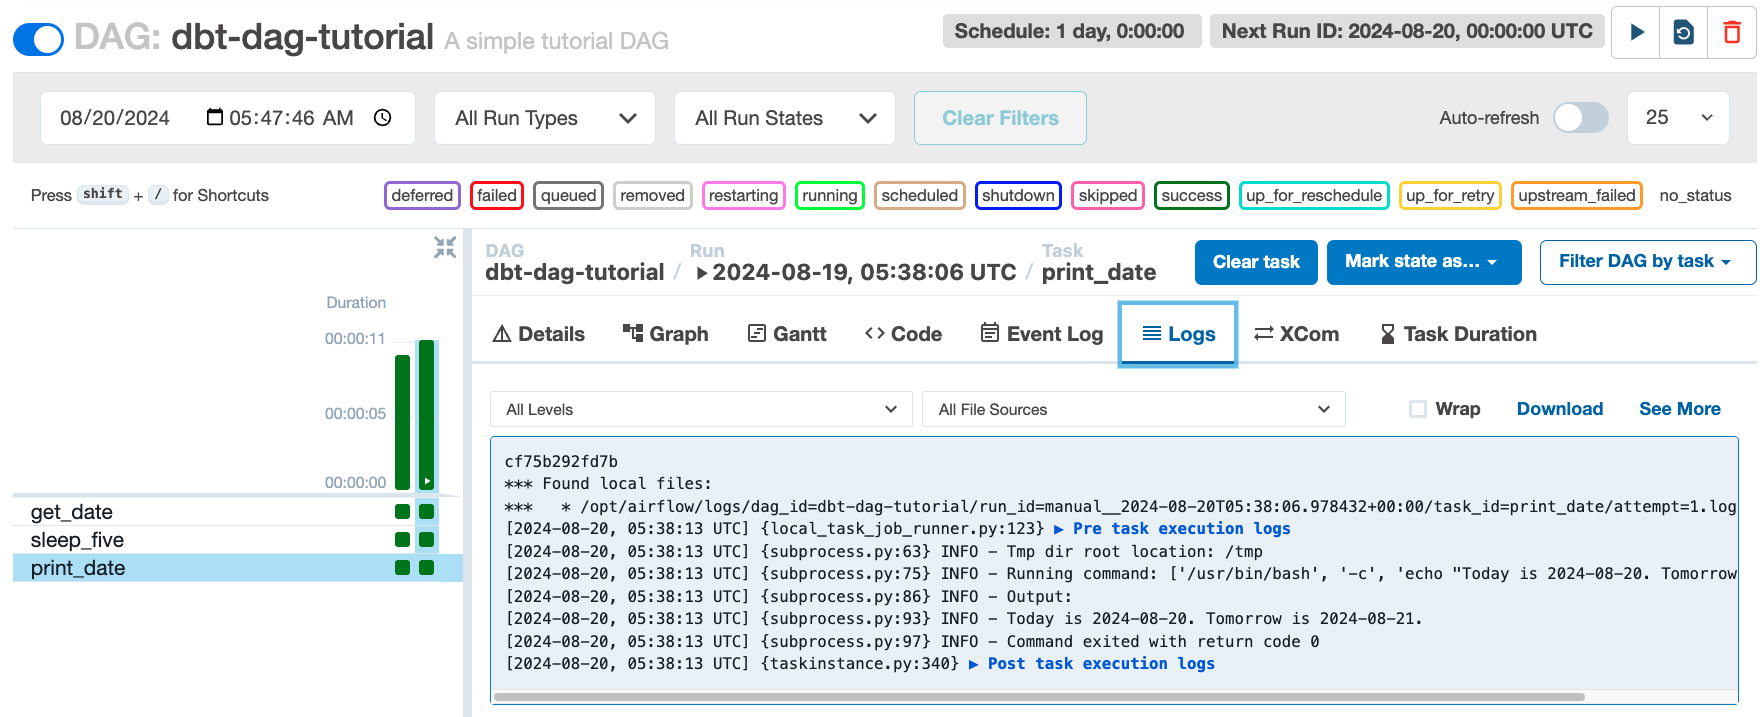
Don't sweat, when your DAG run resolves, navigate to the "Graph" tab and click the print_date task, then find and click the "Logs" tab to see the full output.
It should look something like this, with today and tomorrow's dates printed to the console:
The next step is to create a new folder under /dags called /dbt which is where our dbt project will live.
To setup our dbt project, we'll use the dbt Core CLI's dbt init {{PROJECT_NAME}} command.
Even though we've told our Docker image to install dbt-snowflake which includes the dbt Core CLI, we don't have access to this CLI during local development so we'll need to install dbt-snowflake one more time.
Now we can initialize our dbt application.
$ python3 -m pip install dbt-snowflake
$ dbt init
This will prompt you with a couple of questions, here is how I responded, but feel free to edit to your liking:
$ dbt init
    "
    Enter a name for your project (letters, digits, underscore): data_pipeline
    ...
    Which database would you like to use?
    [1] bigquery
    [2] snowflake
    [3] redshift
    [4] postgres
    ...

    Enter a number: 2
    account (https://<this_value>.snowflakecomputing.com): {{YOUR_SNOWFLAKE_LOCATOR_URL}}
    ...
    Desired authentication type option (enter a number): 1
    password (dev password): {{ANY_PASSWORD}}
    role (dev role): {{YOUR_SNOWFLAKE_ROLE_NAME}}
    warehouse (warehouse name): {{YOUR_SNOWFLAKE_WAREHOUSE_NAME}}
    database (database that dbt will build objects in): {{YOUR_SNOWFLAKE_DATABASE_NAME}}
    schema (... schema that dbt will build objects in): {{YOUR_SNOWFLAKE_SCHEMA}}
    threads (1 or more) [1]: 10
    ...
    "
If you have trouble finding the YOUR_SNOWFLAKE_LOCATOR_URL, open the Snowflake UI, go to "Admin > Accounts" and find your account under the Active Accounts tab. Click on the link icon that shows up when you hover over your account's "locator" attribute in the table.
A lot of folders should populate within a newly created directory named after your project name.
Similar to how the Airflow Docker image mounts and watches for changes in folders like /dags, dbt Core organizes its features by folder.
Here are the most important files and folders that were generated via dbt init:
dbt_project.yml - handles dbt project's configuration, materializing models, mapping folder names to features and ignoring build folders/models - stores dbt model folders including SQL data transformations and model configurations/macros - stores any reusable data transformation functionsYou can delete the /examples model folder, then create two new model folders: /staging and /marts.
Open the dbt_project.yml file and replace the "example" model attribute and its child configurations with the following:
models:
  data_pipeline:
    staging:
      +materialized: view
      snowflake_warehouse: {{YOUR_SNOWFLAKE_WAREHOUSE_NAME}}
    marts:
      +materialized: table
      snowflake_warehouse: {{YOUR_SNOWFLAKE_WAREHOUSE_NAME}}
This will tell dbt Core that we have two models named "staging" and "marts", which will materialize as a view and a table respectively in your previously generated Snowflake warehouse.
Now we'll need to install one dbt package called "dbt_utils", which requires adding a new packages.yml file in the project root and pasting in the following code:
packages:
  - package: dbt-labs/dbt_utils
    version: 1.1.1
To install this package, make sure you are in the dbt project root directory then run the dbt deps command.
A new folder /dbt_packages as well as a new package-lock.yml file should appear in the project root directory.
Open a new YAML file in the /staging folder and title it "tpch_sources.yml".
YAML model configurations help connect data sources and perform relationship tests on the incoming data to ensure data resiliency.
The reason I call this "tpch_sources" is because we'll be using the "tpch_sf1" sample database schema provided by Snowflake.
You can find this schema and the tables we'll be working with using the Snowflake UI under "Data > Databases > SNOWFLAKE_SAMPLE_DATA > TPCH_SF1".
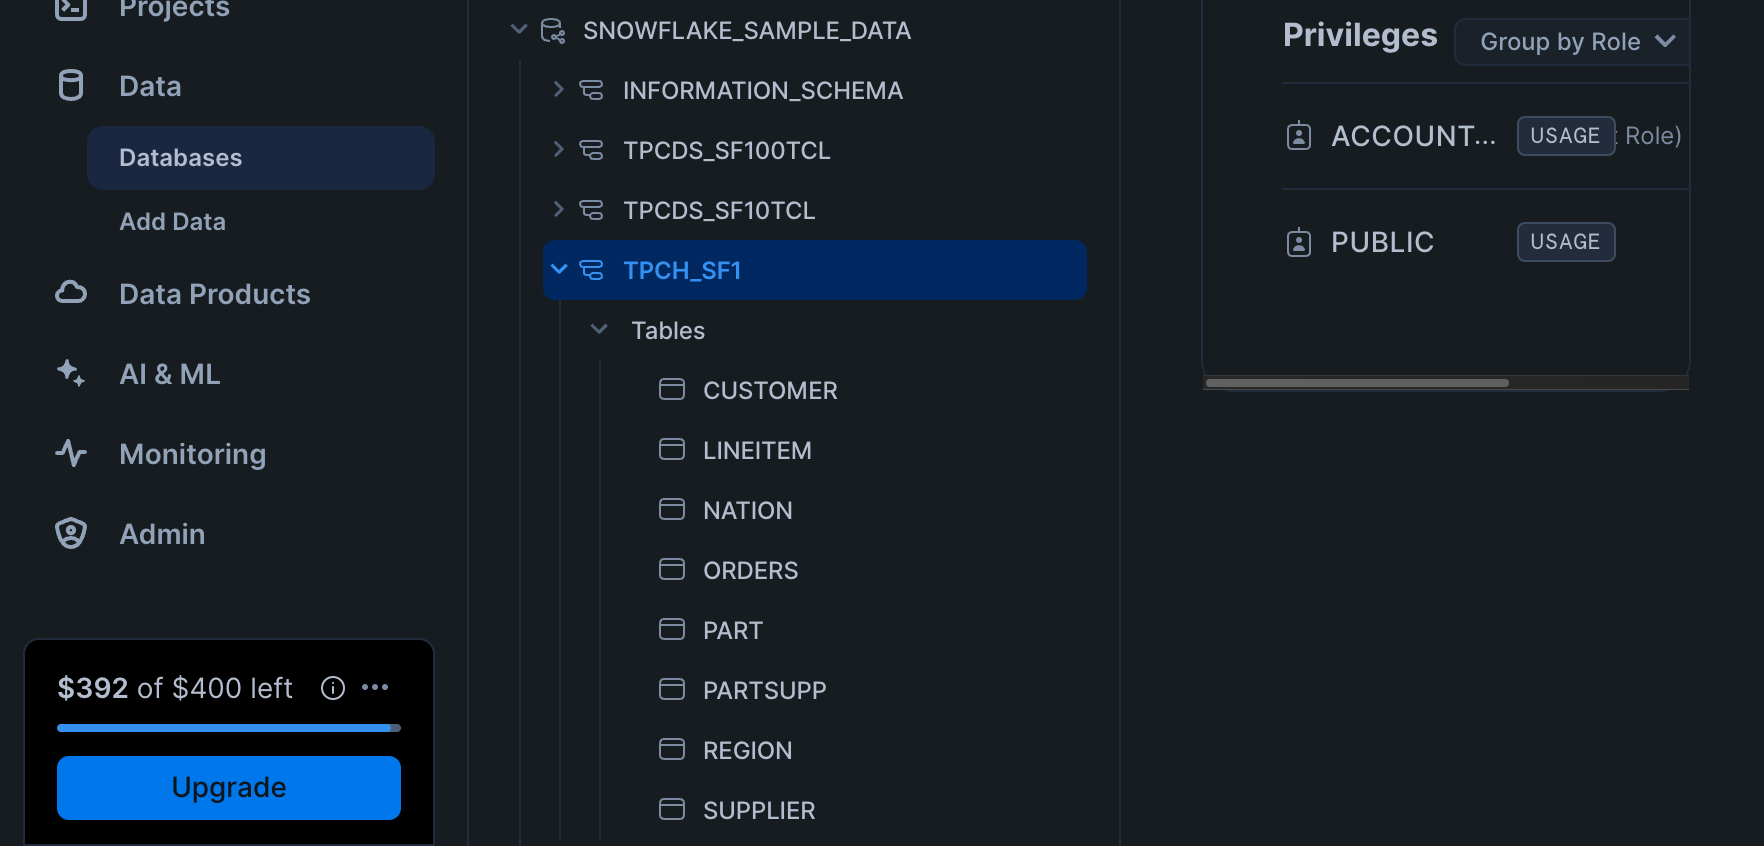
Let's identify the database, schema and tables we'll be using in our first data source in the YAML file:
version: 2

sources:
  - name: tpch
    database: snowflake_sample_data
    schema: tpch_sf1
    tables:
      - name: orders
        columns:
          - name: o_orderkey
            tests:
              - unique
              - not_null
      - name: lineitem
        columns:
          - name: l_orderkey
            tests:
              - relationships:
                  to: source('tpch', 'orders')
                  field: o_orderkey
Under the "tables" attribute, we test table relationships to ensure that l_orderkey is a foreign key on the "orders" table.
This will come in handy later on in this step.
Now whenever we want to use these tables within the "staging" model, we simply create a source reference.
To demonstrate the use of source references on tables, open a new SQL file under the same /staging folder and title it staging_tpch_orders.sql.
Paste the SQL code below:
select
    o_orderkey as order_key,
    o_custkey as customer_key,
    o_orderstatus as status_code,
    o_totalprice as total_price,
    o_orderdate as order_date
from
    {{ source('tpch', 'orders') }} -- Here's the source reference to the "orders" table
We can now test that this SQL model by running dbt run in the bash window.
You should see a message like this when the run completes:
Found 1 model, 3 data tests, 2 sources, 562 macros

Concurrency: 10 threads (target='dev')

1 of 1 START sql view model dbt_schema.staging_tpch_orders ..................... [RUN]
1 of 1 OK created sql view model dbt_schema.staging_tpch_orders ................ [SUCCESS 1 in 1.19s]

Finished running 1 view model in 0 hours 0 minutes and 3.68 seconds (3.68s).

Completed successfully

Done. PASS=1 WARN=0 ERROR=0 SKIP=0 TOTAL=1
To verify your model did what it should have, navigate back to the Snowflake UI under "Data > Databases > {{YOUR_DATABASE_NAME}} > {{YOUR_DATABASE_SCHEMA}} > Views > STAGING_TPCH_ORDERS". For me, this is what I see:
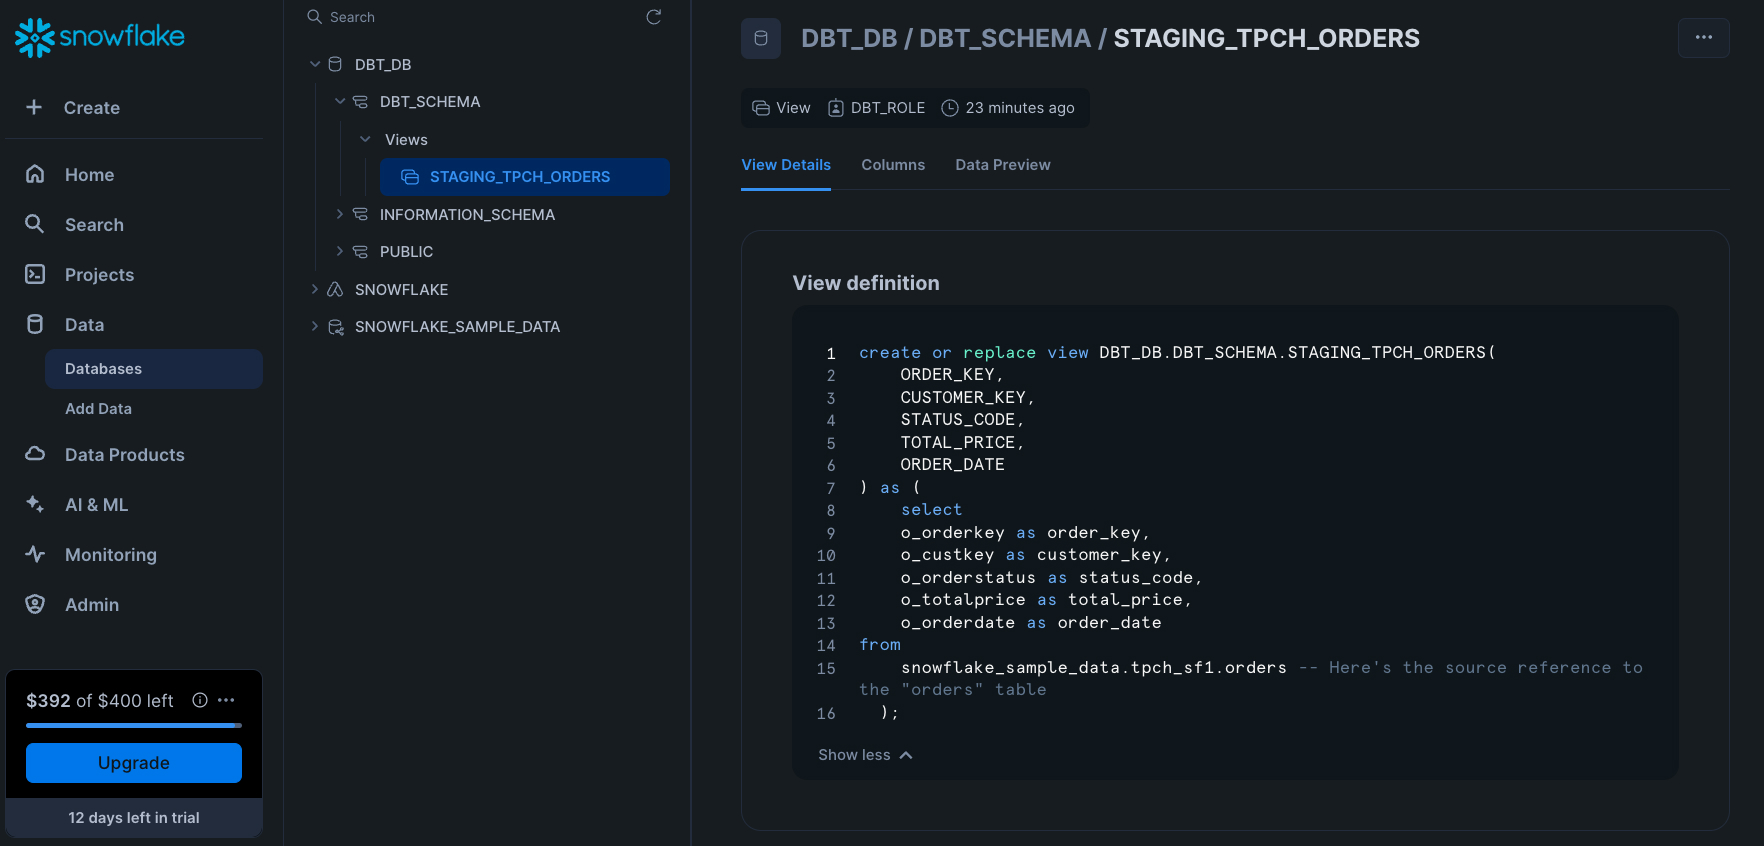
Create one more SQL file under /staging and call it staging_tpch_lineitems.sql.
Here we'll use the generate_surrogate_key macro provided by the "dbt_utils" package we installed earlier to hash each line item's "l_orderkey" and "l_linenumber" columns into a single surrogate key.
select
    {{
        dbt_utils.generate_surrogate_key([
            'l_orderkey',
            'l_linenumber'
        ])
    }} as order_item_key,
	l_orderkey as order_key,
	l_partkey as part_key,
	l_linenumber as line_number,
	l_quantity as quantity,
	l_extendedprice as extended_price,
	l_discount as discount_percentage,
	l_tax as tax_rate
from
    {{ source('tpch', 'lineitem') }}
Macros are dbt's way of adding reusability to data transformations. You can get them from dbt packages or by creating custom ones in the /macros folder.
Here's a simple macro called "discounted_amount" we'll use in the "marts" model shortly. It takes in columns for "extended_price" and "discount_percentage" with a scalar "scale" value as an optional parameter with default value "2".
Feel free to paste the macro code in /macros/pricing.sql.
{% macro discounted_amount(extended_price, discount_percentage, scale=2) %}
    (-1 * {{extended_price}} * {{discount_percentage}})::decimal(16, {{ scale }})
{% endmacro %}
dbt macros use Jinja to extract out columns, apply transformations, and return new columns in place.
Beyond macros, dbt Core handles data lineages for us by tracking SQL file names, which means we can now use both the "staging_tpch_orders" and "staging_tpch_lineitems" SQL file names as reference IDs.
References IDs enable us to use the outputs of data transformations defined by other SQL files as sources to other data models.
To see what I mean, cd into the /marts folder and populate this code in a new SQL file, int_order_items.sql:
select
    lineitem.order_item_key,
    lineitem.part_key,
    lineitem.line_number,
    lineitem.extended_price,
    orders.order_key,
    orders.customer_key,
    orders.order_date,
    {{ discounted_amount('lineitem.extended_price', 'lineitem.discount_percentage') }} as item_discount_amount -- Uses our custom "discounted_amount" macro
from
    {{ ref('staging_tpch_orders') }} as orders -- Makes a reference to the output of the transformation in "staging_tpch_orders"
join
    {{ ref('staging_tpch_lineitems') }} as lineitem -- Makes a reference to the output of the transformation in "staging_tpch_lineitems"
        on orders.order_key = lineitem.order_key
order by
    orders.order_date
This SQL statement does not join the "lineitem" and "orders" tables, but rather the "staging_tpch_lineitems" and "staging_tpch_orders" views on the table we created in the "staging" model. We return some columns from each view and also apply our macro to the "lineitem.extended_price" and "lineitem.discount_percentage" columns to create a new "item_discount_amount" column.
Furthermore, we can reference transformations within the same model.
Let's use the "int_order_items" transformation to create some aggregations on our new "item_discount_amount" column as well as the original "extended_price" column.
In a new SQL file, int_order_items_summary.sql, paste:
select
    order_key,
    sum(extended_price) as gross_item_sales_amount,
    sum(item_discount_amount) as item_discount_amount
from {{ ref('int_order_items') }} group by order_key -- Makes a reference to the output of the transformations in "int_order_items"
The last SQL file we'll create is a fact table for the "orders" table called fct_orders.sql.
To learn more about fact tables, I love this blog post by the Kimball Group.
This final transformation will showcase each order field from "staging_tpch_orders" and the gross item sales as well as the gross item discount amount from the summary we just created.
select
    orders.*,
    order_item_summary.gross_item_sales_amount,
    order_item_summary.item_discount_amount
from
    {{ref('staging_tpch_orders')}} as orders
join
    {{ref('int_order_items_summary')}} as order_item_summary
        on orders.order_key = order_item_summary.order_key
order by order_date
We can now the configuration YAML file for the "marts" model. Open a new file generic_model.yml and paste:
models:
  - name: fct_orders
    columns:
      - name: order_key
        tests:
          - unique
          - not_null
          - relationships:
              to: ref('staging_tpch_orders')
              field: order_key
              severity: warn
      - name: status_code
        tests:
          - accepted_values:
              values: ['P', 'O', 'F']
In effect, this configuration defines the tests and metadata for our "fct_orders" model. We test that there is a valid relationship between the "order_key" in "fct_orders" and "staging_tpch_orders" and taht the values in the "status_code" column from "staging_tpch_orders" are all either "P", "O", or "F". To make sure all models are working properly, run the dbt project one last time:
$ dbt run
With that, we are now ready to move onto fusing these models into a DAG using dbt and Airflow.
At this point, we've created our dbt models and setup Airflow, but they are distinct entities, not a unified data workflow.
The models can be built locally using the dbt Core CLI but using an Airflow BashOperator for the dbt run command will make the whole data pipeline a blackbox.
We need to convert the dbt models into an Airflow-readable DAG that draws connections between data transformations.
Moreover, dbt Core has stored our Snowflake connection locally at ~/.dbt/profiles.yml, which we will need to somehow copy into the Docker container.
To handle the latter issue, for simplicity sake, we can literally copy the profiles.yml file into a new folder called /profiles under the dbt project root directory.
To handle the former issue, navigate back to the Airflow project's dbt_dag.py file and edit it so it references our Snowflake connection profile and uses our dbt models.
from datetime import datetime, timedelta
from pathlib import Path

from airflow.models.dag import DAG
from airflow.operators.empty import EmptyOperator

from dbt_airflow.core.config import DbtProjectConfig, DbtProfileConfig
from dbt_airflow.core.task_group import DbtTaskGroup

# Create temporary DAG resource
with DAG(
    "dbt-dag-tutorial",
    schedule=timedelta(days=1),
    start_date=datetime(2021, 1, 1),
    catchup=False,
    tags=["example"],
    default_args={
        "owner": 'airflow',
        "retries": 1,
        "retry_delay": timedelta(minutes=5),
    },
) as dag:

    # Task 1 - Dummy task
    t1 = EmptyOperator(task_id="dummy_1")

    # dbt Task Group - Converts dbt models into Airflow DAG
    t_dbt = DbtTaskGroup(
        group_id='dbt-group',
        # Configures the path to the project and project manifest for generating dependency graph
        dbt_project_config=DbtProjectConfig(
            project_path=Path('/opt/airflow/dags/dbt/data_pipeline/'),
            manifest_path=Path('/opt/airflow/dags/dbt/data_pipeline/target/manifest.json'),
        ),
        # Configures the path to the profile for connecting dbt to Snowflake
        dbt_profile_config=DbtProfileConfig(
            profiles_path=Path('/opt/airflow/dags/dbt/data_pipeline/profiles'),
            target='dev',
        ),
    )

    # Define the DAG
    # dbt Task Group depends on Task #1
    t1 >> t_dbt
Here we're leveraging the "dbt-airflow" package's "DbtTaskGroup" Python class to co-locate dbt project and Snowflake profile configurations using the "DbtProjectConfig" and "DbtProfileConfig" classes respectively.
Behind the scenes, the "dbt-airflow" package reconstructs the dbt models in our dbt project directory into Airflow tasks, each with a specific BashOperator to execute commands from the dbt Core CLI.
The "DbtProjectConfig" project_path parameter is set to the path of the dbt project root, which tells "dbt-airflow" where the dbt models, tests, and snapshots are while the manifest_path parameter locates manifest.json file which reconstruct the DAG from metadata outputted by dbt Core from the latest dbt run command.
The "DbtProfileConfig" links each dbt Core CLI command with the Snowflake profile configuration we just moved inside the /profiles folder.
Overall, the effect of Airflow running dbt_dag.py is a once-daily scheduled execution of dbt run.
Opening up the Airflow UI (localhost:8080) and selecting "dbt-dag-tutorial" from the list of DAGs, we can now view the automatically generated task group containing the models and tests we built with dbt.
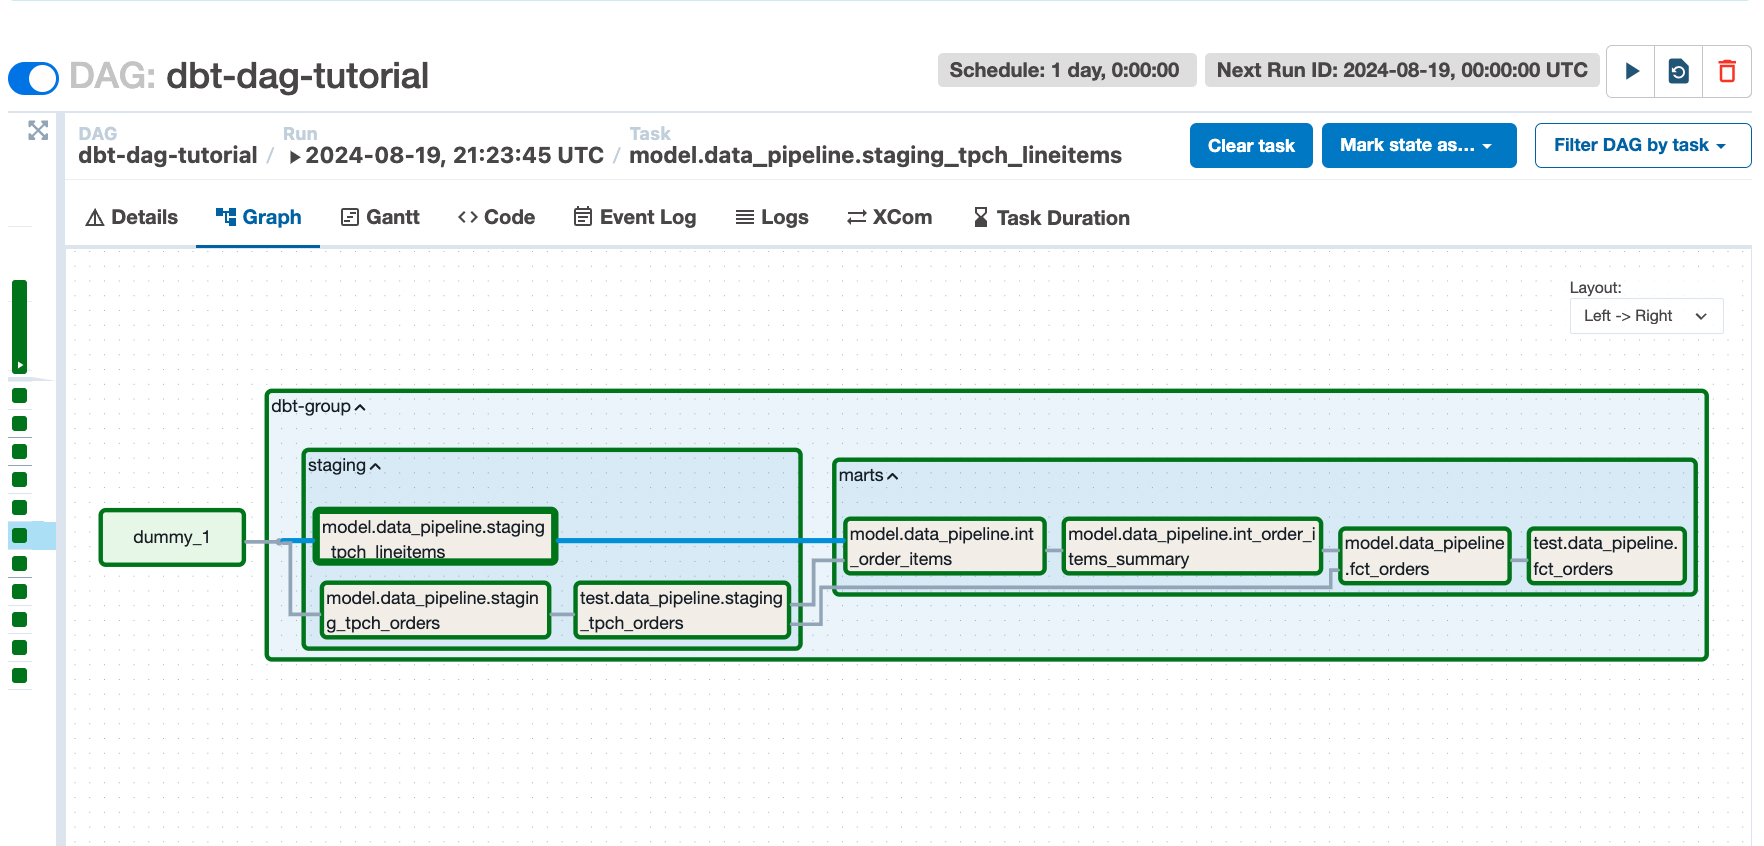
Clicking the Play button in the top-right corner once more, we can see that the DAG runs successfully (denoted by green squares next to each task).
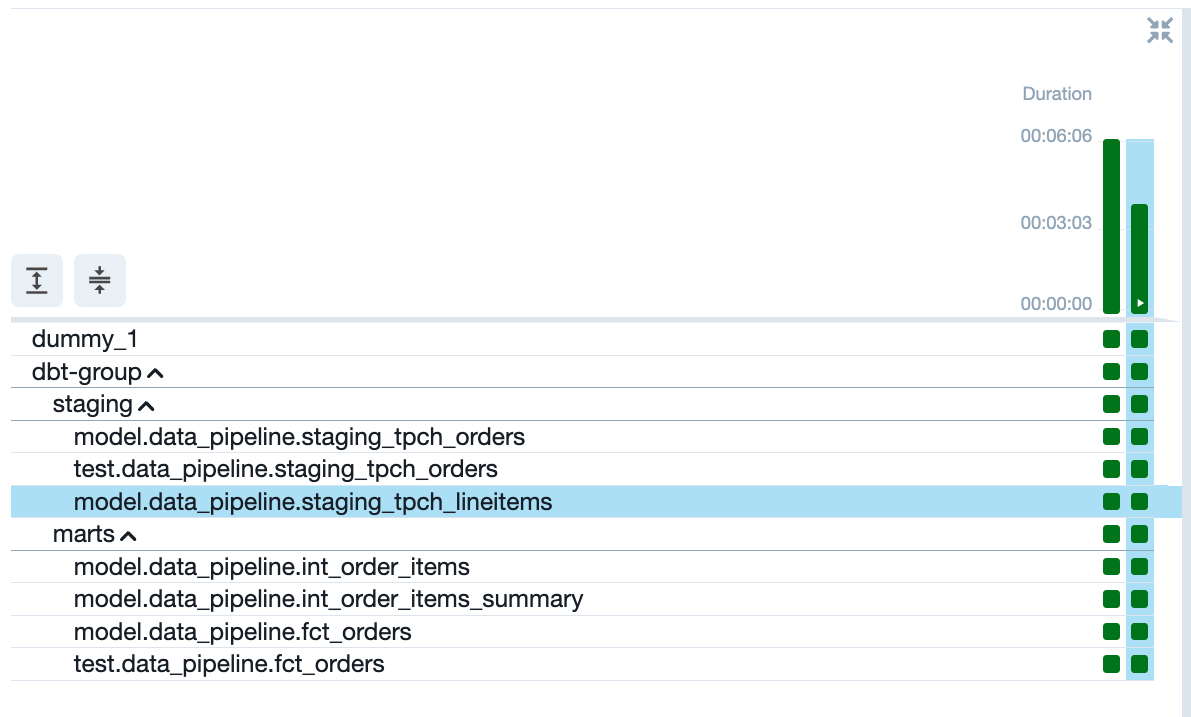
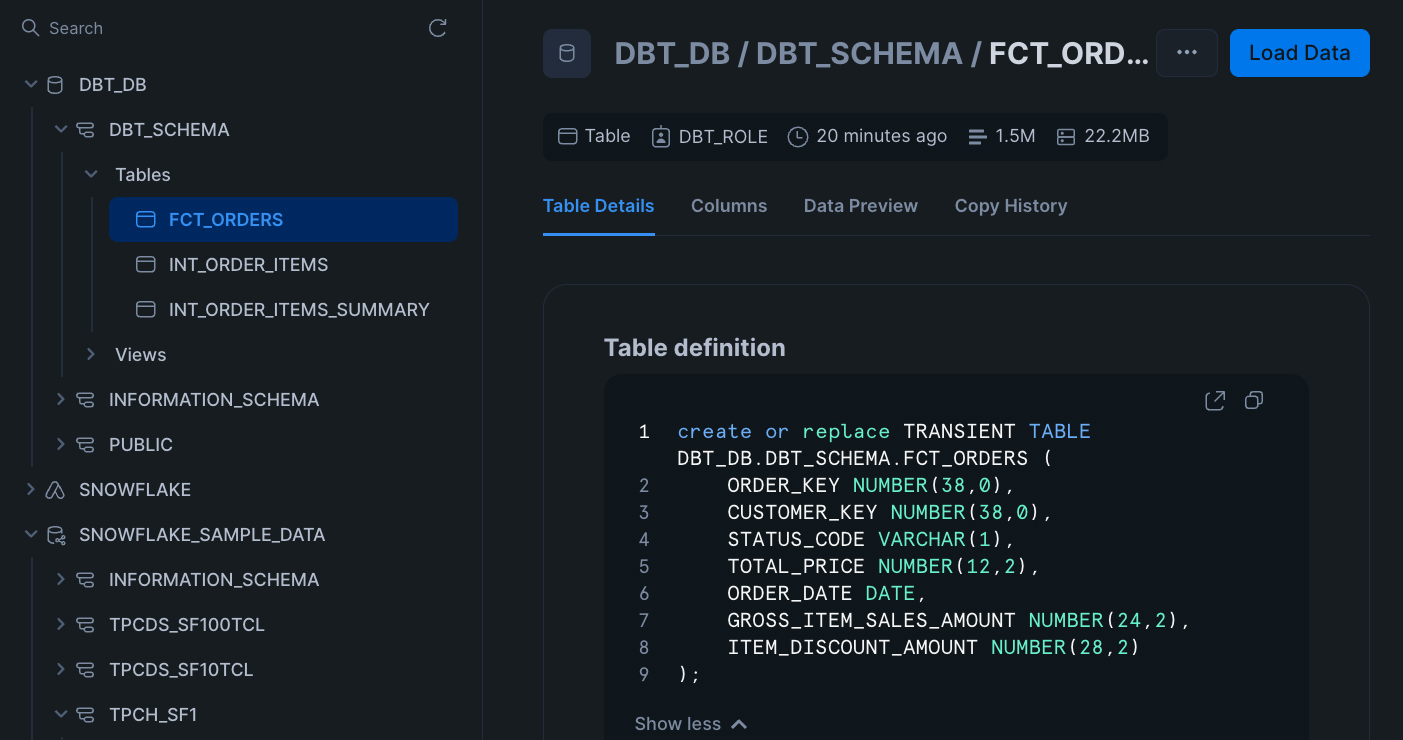
The last thing to do is check that Snowflake has been updated. In the Snowflake UI, navigate to "Data > Databases > {{YOUR_DATABASE_NAME}} > {{YOUR_DATABASE_SCHEMA}} > Tables > FCT_ORDERS".
The timestamp should reflect your most recent DAG run from within Airflow and the memory size should read about "22.2 MB".
Congratulations, you now have your very own ELT pipeline up-and-running! 🎉 Thank you for joining me for this tutorial!
Please share and consider giving the tutorial repository a star on GitHub!